

Summer is the perfect time to tackle a painting project! A fresh coat of paint can do wonders to an old piece of furniture.
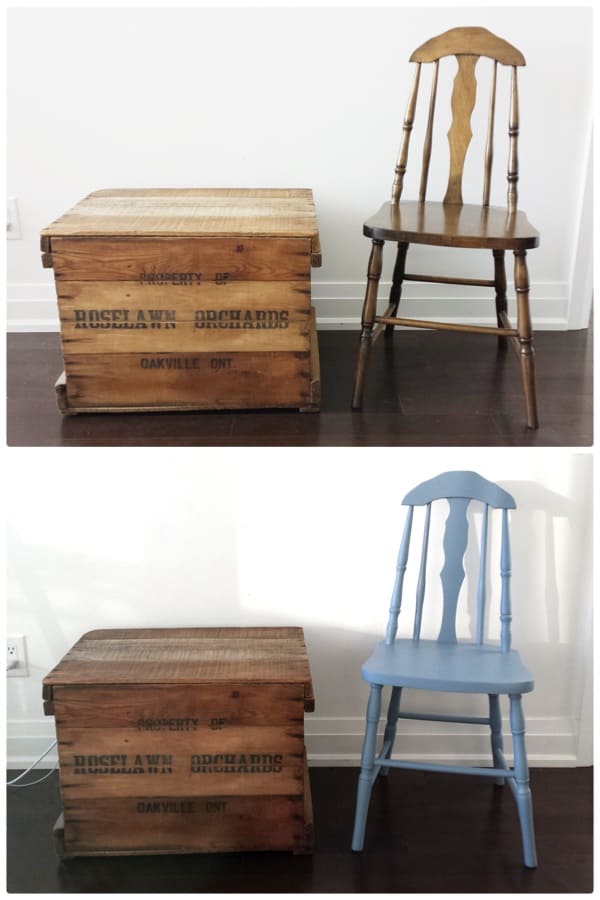
While visiting my boyfriend’s parent’s cottage, this wooden antique chair caught my eye. It was sitting oh-so-inconspicuously in the corner of one of the guest bedrooms. I love its classic shape with the windsor carved legs and backrest. Lucky us, his parents let us give this little chair a new home. Me and my boyfriend have started collecting interesting furniture pieces and I thought he would look great with our salvaged wood crate and antique trunk in my living room. But first, a fresh coat of colored paint!
Here’s a photo of the original wood stained chair.

How to Paint Old Furniture:
The great thing about painting, is you don’t need many tools. When it comes down to it, all you really need is paint and brushes. But to do the job right make sure you have the rest of these tools and materials.
Materials & Tools:
- Sand paper – Get a few course sheets (80 grit or so), and few finer sheets (150 grit).
- Primer
- Paint – Glossy finishes are the most durable, but flat finishes help to hide imperfections. Most paint finishes now, even flat, will hold up to a little cleaning.
- Paint brush
- Gloves – this is messy work!

Steps to painting
- Set up – Lay down some newspaper or plastic on the floor to keep the area clean. It’s best to paint in an open space with good air ventilation.
- Sand and prepare – Now it’s to get messy. You’ll want to make sure you wear gloves for this step. Not only it is very dusty, but you’ll want to protect your hands. Start with your course sand paper and start sanding away! I usually start out using 80 or 100 grit sandpaper. The coarser sand paper will help remove the old paint and give a fresh surface for your paint stick to. Once most of the paint has been removed, switch to finer sand paper with 150 grit or higher to get rid any remaining bits of paint and smooth out the surface.
- Sanding makes a mess, so once you’ve finished sanding, take a warm damp cloth and wipe down your furniture. It’s important to remove all the dust to make sure the paint is able to make a strong bond with the wood.
- Once your piece is all clean, you’re going to need to prime it…. Ok. So I cheated here, I didn’t bother using priming my chair. I know everyone says you should prime, but really, it’s going to be sitting indoors, not in a home with children, probably not getting much use. I’m sure the paint will hold up for at least 5 years, and if it does get worn, I rather like the shabby chic look anyway!
- Painting – Apply your first coat of paint in a nice thin layer. Painting is pretty straight forward, just don’t glob the paint on, and move your brush in smooth even strokes, and you should be all good! If you’re painting small areas that need more detailing, I found the sponge brush to be great for getting into little corners. It’s important to let piece of furniture dry completely before the 2nd coat of paint, so make you allow enough time. Apply your 2nd coat of paint and if you really want it to be durable you can add a top coat at this point. But for me, 2 coats of paint is just fine. 🙂
And here’s my finished piece!
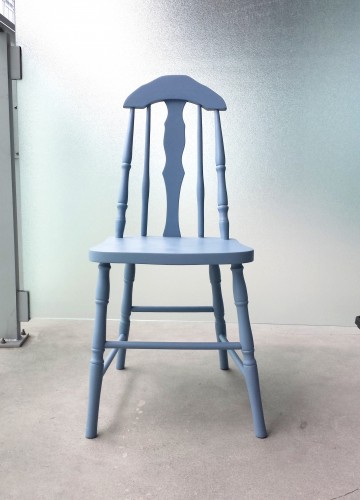
And here’s a before and after comparison.
Now that I’ve painted one thing, I’ve been bitten by the painting bug and I just want to paint everything! Picture frames, patio furniture, it’s such an easy way to give a fresh look to old objects.
Will you be doing any painting this summer? Let me know in the comments below!


Justine Chambers
August 30, 2013Great find and gorgeous results!
Eileen
August 31, 2013Thanks hun 🙂
caroline
July 29, 2013Oh I’m such a fan of painting old furniture! This is so wonderful.
xo
styleontheside.com