


I can’t remember when was the last time I did a DIY project, but it’s been a very long while. I used to do little DIY projects all the time, from making my own candles to whipping up a batch of my own body butter.
It’s funny how things change and you go in different directions in life. For those of you who are long time readers, you might remember that my blog used to be mainly focused on DIY projects, but over the last few years my passion for fashion and beauty have come to the forefront.
And don’t get me wrong, I always do what I love, but working on this DIY project just reminded me how much I also enjoy creating with my own hands. So keep an eye out, you’ll probably see a few more DIY‘s coming your way the next little while.
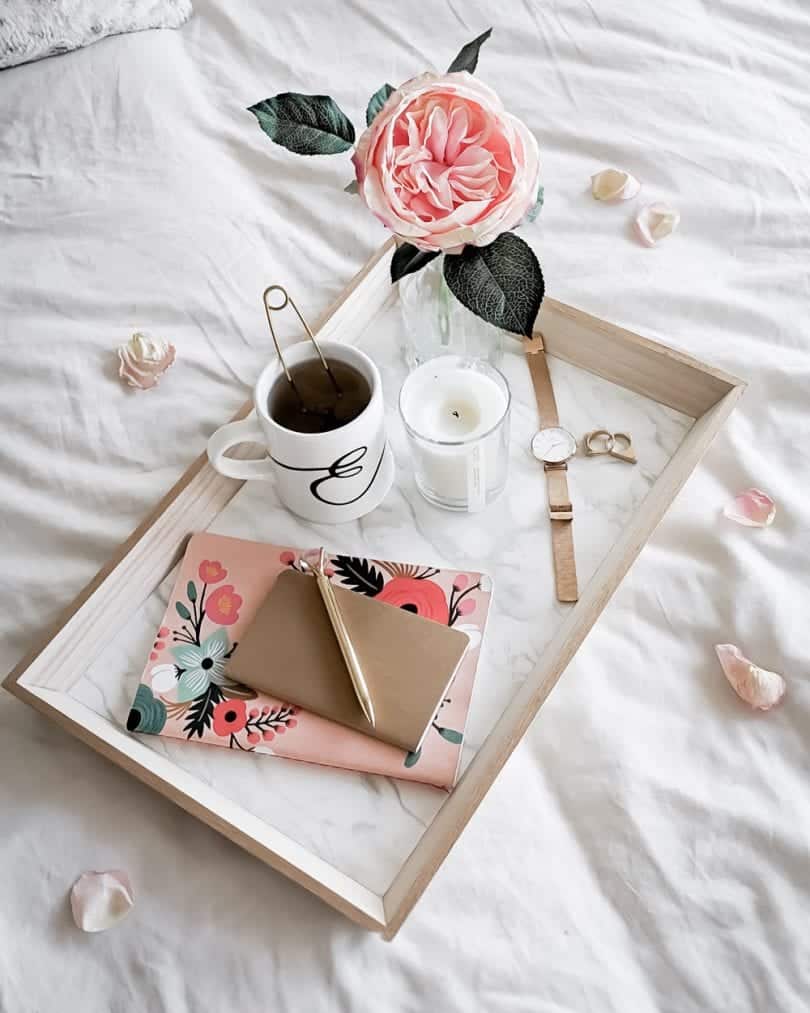
I picked up these plain wooden trays for a Christmas party as serving trays. But after the holidays I thought it might be fun to convert them to a breakfast trays.
They’re fairly lightweight and quite sturdy, but just looked a little plain just the way they were. I had some marble contact paper already in my home and thought it would be nice to dress them up with laminate and give him a bit of glam with a gold foil pen.

DIY Breakfast Tray with Marble and Gold Details
Supplies:
- plain wooden tray – great deal on these!
- marble contact paper
- gold leafing pen
Tools:
- Pencil
- Scissors

DIY Breakfast Tray Tutorial Instructions
Step 1 – Prep and plan
The great thing about this DIY project is it doesn’t require anything fancy at all, just your tray, contact paper, a gold pen and some scissors, and a pencil.
On the backside of the contact paper, there is always have a grid to help you get the measurements just right.
I just measured off the area that need to be covered by placing the contact paper over the tray and used a pencil to mark off the areas to cut off.

Step 2 – Cut and apply
Once the contact paper is trimmed, just to double check, lay your contact paper against the tray to make sure it’s a good fit.
It’s easier to make adjustments now, rather than after you’ve pulled off the sticker backing. Once you’re sure it s a good fit.
Peel off one edge of the backing and line up the contact paper against the tray edges. Smooth out the air as you go and roll the back off a bit at as time as you go.

Step 3:
Last step is add the gold trim. I simply just used a gold leaf pen and colored along the edge. I went over the area twice to make sure everything was even. Voila and you’re done!

This DIY marble and gold tray was probably one of the simplest DIY’s projects I’ve done, but I’m really happy with how they turned out.
It’s definitely an upgrade from the plain wooden trays they were originally. And I’ve been putting them to good use too, they’re just handy to have when you have a hot drink in bed and need a surface to put it down on, or just hold my books and journals on. Plus, it makes a pretty piece of decor don’t you think?


Kimberly
February 7, 2019I love this!
alwayskimberly.com
Eileen
February 7, 2019Thanks so much Kimberly!
Eileen
February 1, 2019Thanks so much Candice !
Candice Sandler
January 29, 2019Ah this is so cool! Thanks for sharing
Candice | NatalyaAmour.com