

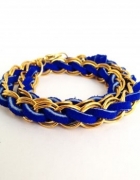
Part 3: Suede and Chain Woven Bracelet Tutorial
Here it is! The part 3 in my woven chain bracelet series! So in this week’s tutorial, there are 2 variations to this bracelet, both using exactly the same simple wrapping technique! One look creates a chevron style pattern, while the other will create a diagonal stitch pattern.
If you haven’t already, make sure you subscribe so you won’t miss the upcoming tutorials for my suede and chain woven bracelet series that I’m doing! My next tutorial will show you how to create a cross style woven chain woven bracelet!
Materials & Supplies:
- Curb chain – about 7 inches or length of bracelet you need. I’m using 10×7 mm matte gold chain.
- Suede lace – about 2 yards
- Bead with large hole (optional for finishing ends) OR some jumps rings and lobster clasps.
To make things easy for you, all the materials for this tutorial are available in a handy bracelet kit available in my Etsy shop!
Let’s start crafting this DIY Bracelet!
- Cut your 2 yards of suede lace in half. Take 1 strand of the lace and loop it through the top of the chain. Tie a regular knot leaving the ends uneven, with one strand approximately 12 inches on side and the other with the remaining 24 inches
- Line up the shorter piece suede lace to the right side of the chain bracelet. Now take the longer strand and thread through the top link from front to back and wrap it around the chain and other piece of suede on the right side.
- Then, thread the rope through each link, including a piece of the shorter piece of suede lace.
- Keep threading and wrapping down the length of the chain bracelet.
- When you come to the end knot off the ends.
Now for the 2nd half of the bracelet, you have 2 variations…
Turn your bracelet upside down, so the side you’ll be working on will be the right side again. Tie the 2nd strand of suede lace the same way you tied the first piece in the beginning.
1. Create a chevron style pattern by weaving the lace in a mirror like image from the way you did on the first side. So if on the first half of your bracelet you threaded the suede lace threading from front to back. This time you’ll want to thread the suede rope from back to front.
2. Create a diagonal stitch pattern by weaving the suede exactly in the same direction as you did on the first side.
Below is picture with more detailed comparison of the 2 styles: diagonal stitch vs chevron style. By changing the direction of the way you’re threading the suede lace, you can create 2 unique patterns.

Finish it off:
I’ve simply used a large hole bead and gathered all the strands through it, to make an adjustable sliding closure. You’re welcome to simply tie the ends or add some jump rings with a lobster clasp. But I like the sliding bead closure, it’s simple and pretty.
Like with all my tutorials, you can also find these suede & chain woven bracelets and more in my Yes Missy Arm Candy Shop!
For more DIY bracelet ideas,
check out my DIY Chain Bracelet Series!
Let’s connect on Facebook | Twitter | Instagram | Google+ | Bloglovin‘

I hope you enjoy this tutorial. If you missed it, check out part 1 and part 2 of my chain woven bracelet series! And stay tuned for next woven chain tutorial in the series next week! Make sure you subscribe so you won’t miss it!
I love to hear what you think, so don’t forget to leave me comments and feedback below!


Fatima
June 26, 2014These are lovely!
But since I’m new at this, I’d appreciate if you could upload a video of this tutorial
Eileen
July 8, 2014Thanks Fatima, I don’t have any videos at the moment. But it’s definitely something I want to considering doing for the future!
Cheers,
Eileen
Eileen
November 29, 2013Hi Riley,
First you need to finish off the ends. Clip them short and use a glue gun to secure them. Then you just add jump rings to the the chain. I typically use 3 for each end: 1 for each of the 2 chains, and then one more to link them both together. Then attach your clasps to the final jump ring and you’re all set. I’ve attached a photo for you here as an example. Hope that helps you out!
Cheers,
Eileen
Riley
November 29, 2013How do I add jump rings and a clasp instead of the bead?
sara
August 2, 2013How do you finish off the ends? like adding the bead and tightening the bracelet? is there some sort of loop to put the bead through in order to fasten it?
Thanks!
YesMissy
August 4, 2013Hi Sara,
To finish the ends, you can just tie the ends in the simple knot. The suede lace should hold it well enough. As for slipping the bead on, a trick that helps is to bind all the ends together with some scotch tape, then thread the bead through.
Cheers,
Eileen
Amanda
July 23, 2013These are really great! I love the combo of soft leather and heavy chain. So cool.
karlizoma
June 25, 2013So far so good! Intriguing
YesMissy
June 26, 2013Thanks 🙂
Melissa
May 30, 2013Love these! They look great stacked together!
Aki
April 10, 2013So pretty! I made it but I can’t find the right beads to finish off the ends. Would you mind telling me where you got those beads?
Sarah
March 13, 2013I love it! I’m going to try, where did you get the chain from?
YesMissy
March 13, 2013Thanks! I got the chain from Michael’s, they have lots of different colors too, like bronze and silver.
Cheers,
Eileen
allison {TAYLOR-MOSELEY}
March 12, 2013Beautiful!!
YesMissy
March 13, 2013Thank you 🙂
Kaori
March 10, 2013super! I’d like to try it soon!
YesMissy
March 10, 2013Thanks! Love to see it when you do 😉
caroline
March 9, 2013Love this!
xo
girlintheyellowdress.com
YesMissy
March 9, 2013Thanks Caroline! 🙂